8. July 2022 By Alexander Zielinski
Add functions to MS Planner via MS Power Automate – part 1
MS Planner does not (yet) natively offer the option to create recurring tasks. In my blog post, I’ll be describing how you can achieve this by also using Power Automate and expand the flow with additional features.
There are three things involved in the approach:
- Microsoft Planner
- A list in MS Teams or SharePoint
- A flow in MS Power Automate
These three components perform the following tasks:
- The data for the recurring tasks is stored in the SharePoint/Teams list, meaning that the attributes correspond to those available for tasks in MS Planner.
- The Power Automate flow is scheduled to run daily and creates tasks.
- Microsoft Planner is used for task processing taking a well-established approach.
The basic functionality is then expanded:
1. Generate checklists on the basis of the tasks.
2. Set the categories using an http connector (I will explain how this is done in the second part of my blog post).
In the section below, I will first demonstrate a basic executable version of the solution, which should be sufficient for a number of application scenarios. This will progressively be expanded as we go along to include solutions for items one to three. I will only cover the most important connectors here.
Basic scenario
Creating the SharePoint/Teams list
The SharePoint and/or Teams list is the starting point for the recurring tasks. From here on out the list will be called recurring tasks. The list of the basic version is structured as follows:
| Attribute | Type (description) | Meaning |
| Title | One line of text | Task title in MS Planner |
| Interval | Whole number | Execution interval in days |
| LastCreationDate | Date and time (date only) | Date of last creation date (set in flow) |
| NextCreationDate | Date and time (date only) | Date of next task creation (determined in the flow) |
| UserToAssign | Person or group | One or more users or groups from the Active Directory |
| Description | Multiple lines of text (text only) | Description of the task in MS Planner |
| ProcessingTime | Integer (default value: 1) | How long the task is carried out in days |
Power Automate Flow
This figure the Power Automate Flow
Retrieving SharePoint data
The flow starts by retrieving the tasks due that day from the SharePoint list. The URL has the following format: https://xxx.sharepoint.com/sites/<<Teams_room>>. xxx is typically the company name, while <<Teams_room>> is the name of the team room (without spaces). After entering the URL, the possible lists are displayed in the list name dropdown list. For further processing, you now need to filter the list. To do this, show the advanced options and enter the following formula in the Filter query section:
NextCreationDate eq ‘utcNow()‘
We have created the list attribute NextCreationDate with the property Date only. The utcNow() function returns a full timestamp by default. Comparing both values in Power Automate with the operator eq generates an error because the operands are of different types. The solution can be found by pressing the three dots in the function or by clicking the function. You have the option to format the output generated by utcNow here. We can obtain the correct format for our comparison using
utcNow(‘yyyy-MM-dd‘)
To begin with, we only need a flow variable:
Flow-Variable
| Flow-variable | Type | Meaning |
| UserIDs | String | E-mail addresses of the assigned users |
Creating tasks for the current day
Tasks for a day are created using a for-each loop; the expression for this in Power Automate is Apply to all. Value is the output generated by the Get items connector. Another loop is run within Apply to all, in which the UserIDs are combined into a string.
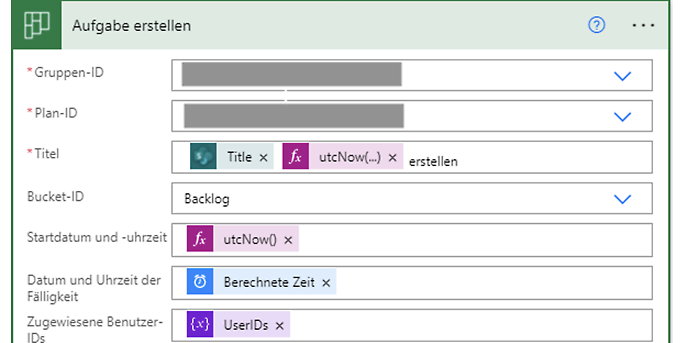
The two time interval connectors calculate the due date (using the ProcessingTime attribute) and the date on which the task should be executed next (based on the interval). Microsoft Planner requires a string of e-mail addresses for the users, separated by semicolons. The string is generated in the Add responsible user to variable loop. The Planner task is created with the following settings:

Aufgabe erstellen mit mehreren Usern durch die String-Variable UserIDs
Under Group ID, select the name of the Teams room, or else this should be pre-set. The plan ID is the name of the planner in Teams. As the project manager, I am the one who creates a monthly report. To do so, I enter the title from the SharePoint list along with the month/year in the task title. If you want to use the same approach, the format will look as follows:
utcNow('MM/yy').
Updating the task and SharePoint entry
The description is added using Update task. In the final step, the Teams list entry is set to the future, previously calculated execution date, while last execution is set to the current date.
Advanced scenario
Overview of the changes to the extended flow
In the advanced scenario, the SharePoint list is expanded and more variables are needed in the flow. Expanding the SharePoint list:
| Attribute | Type | Meaning |
| CheckListItems | Text field, multiple lines | CheckListItems Text field, multi-line Checklist entries, separated by line breaks |
Additional flow variables:
| Flow-Variable | Type | Meaning |
| ChecklistItems | Array | Array for Checklist entires |
This figure shows the outer loop with the modifications for checklists
Creating checklist entries
There are several ways to save checklist entries in the Teams list. I have chosen the one that is quite easy to implement. I have added a multi-line text field – CheckListItems – to the list as well as a line break after each entry. Before I do this, I first check whether the attribute for ChecklistItems is populated; the Empty function is used for this purpose:
empty(items('Auf_alle_anwenden')?['CheckListItems'])
The ‘false’ path of the condition is empty. The ‘true’ path contains the Compose connector. This divides the string from the SharePoint list into an array. Like in many other programming languages, the Split function is used for this purpose. The challenge here was how to insert the line break, since an ASCII/UTF8 character did not produce the desired result. This problem is resolved by using
decodeUriComponent('%0A')
In my example, the full split function looks like this:
split(items('Auf_alle_anwenden')?['CheckListItems'],decodeUriComponent('%0A'))
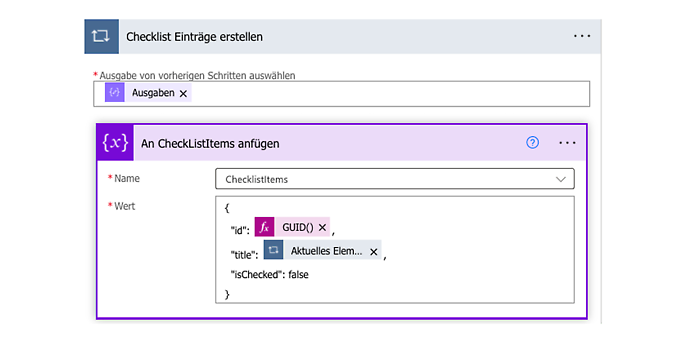
The array that I just been created is now run through, creating the required structure for the checklist items and storing it in the ChecklistItems array:

JSON-Struktur für Checklisteinträge füllen und im Array ChecklistItems ablegen
The categories are later generated in the same way.
When updating the task, the array that was created can be added directly. To do this, you will need to click the icon shown with ‘T’ in the checklist panel.
The practical functions offered by Planner can be expanded using Power Automate to include other great options. Power Automate supports you during the development phase with a range of tools to ensure you face a minimum number of obstacles at the start.
In this blog post, I have combined existing modules from Power Automate like Lego bricks to meet two requirements specific to Planner. Power Automate can also call REST APIs, meaning that the possible use cases are not limited to the existing Power Automate modules. In the second part of my post, I’ll show you how to call the Microsoft Graph API using Power Automate. I will remain with the topic of Planner and show one way how to create categories in Planner using the Graph API.
Would you like to learn more about exciting topics from the world of adesso? Then check out our latest blog posts.

